Mastering Gesture Recognition with Raspberry Pi and APDS9960 Low-Cost Sensor

In the world of electronics and IoT, gesture recognition has emerged as a fascinating and practical technology. Whether it’s controlling your favorite gadgets with the wave of a hand or adding a touch of magic to your projects, gesture recognition sensors play a pivotal role. Among the numerous sensors available, the APDS9960 stands out as a versatile and widely used I2C sensor at a very affordable price. In this blog post, we will take you on a journey through the fascinating world of gesture recognition using the APDS9960 sensor on a Raspberry Pi and any of our popular add-on boards: ANAVI Infrared pHAT, ANAVI Light pHAT, ANAVI Gardening uHAT, ANAVI Info uHAT as well as ANAVI Miracle uHAT and ANAVI CO2 uHAT (both of which are in final development).

What is APDS9960?

APDS9960 is an I2C (Inter-Integrated Circuit) sensor produced by Broadcom (formerly Avago Technologies). It is known for its versatility and is commonly used for gesture recognition, proximity sensing, ambient light sensing, and color sensing applications. Gestures are detected at a distance of 10 to 20 cm. The sensor has built-in UV and IR filters for better recognition. Its wide range of applications makes it a favorite choice among electronics enthusiasts, engineers, and hobbyists. Ovewr the years APDS9960 has been integrated in many popular consumer electronic devices, including Samsung Galaxy S5 smartphone.

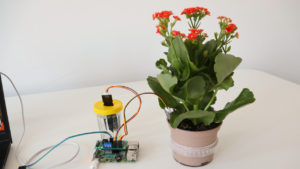
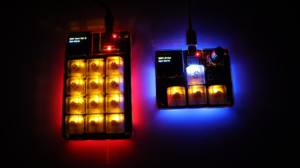
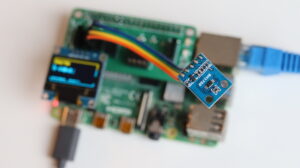
In this tutorial, we will explore how to set up gesture detection on a Raspberry Pi running the Raspberry Pi OS Linux distribution. Specifically, we will use the APDS9960 I2C sensor connected to a Raspberry Pi uHAT (add-on board) and a mini OLED SSD1306 I2C yellow-blue display.
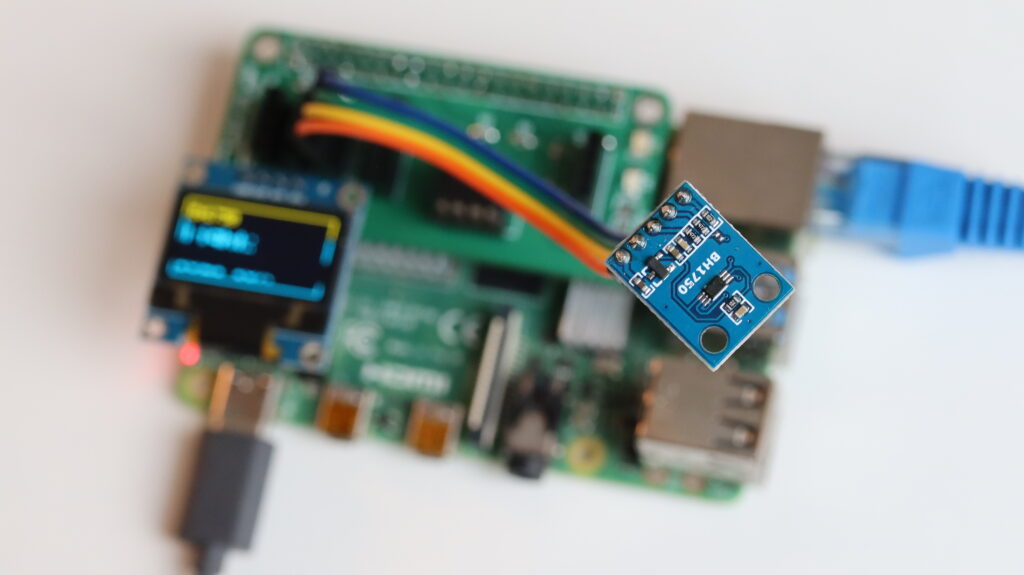
BH1750 I2C light sensor attached to ANAVI CO2 uHAT and a Raspberry Pi single board computer running GNU Linux distribution

🔌 Hardware Setup

Both APDS9960 sensor and the mini yellow-blue SSD1306 OLED display rely on the serial communication protocol I2C that allows multiple electronic devices to communicate with each other using only two wires: serial data (SDA) and serial clock (SCL). Raspberry Pi single board computers have two different I2C busses. The primary I2C bus is at GPIO 2 (physical pin 3 for SDA) and GPIO3 (physical pin 6 for SCL). These pins should be used to attach APDS9960 and the mini OLED display to the Raspberry Pi. Also APDS9960 should be connected to 3.3V and GND pins of the Raspberry Pi to be powered. This makes 4 wires in total to attach the sensor. ANAVI HATs (Hardware Attached on Top) for Raspberry Pi offer dedicated slots for I2C sensors. On ANAVI Info uHAT and ANAVI CO2 uHAT there are even dedicated slots for the mini OLED display.

Of course the OLED display is optional and as an alternative we offer a simple command-line Python3 example for APDS9960 which can function without the OLED display.

🖥️ Software Setup

The software setup is straight forward: install Raspberry Pi OS on microSD card, boot your Raspberry Pi and enable I2C using raspi-config. More details are available in the user’s manual for our HATs.

🐍 Python3 Scripts

The heart of our demonstration are scripts written in the Python 3 programming language. We’ve tailored the script to work seamlessly with Raspberry Pi OS, but it should also run smoothly on any other GNU Linux distribution. These scripts rely on popular Python3 libraries like PIL and Luma OLED. You can find the source code on GitHub for reference and further experimentation:
https://github.com/AnaviTechnology/anavi-examples/tree/master/sensors/APDS-9960/python

There are two different Python 3 scripts to demonstrate APDS9960 gesture detection:

  • gesture-oled.py for detecting gestures and showing them on the mini OLED display as in the video
  • gesture.py for detecting gesture and printing them in the command-line interface (use this one if don’t have a suitable mini OLED display)

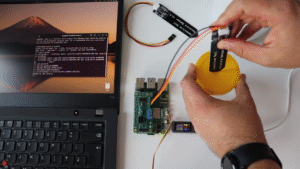
👁️ Real-Time Gesture Detection

Experience the magic as the APDS9960 sensor detects your hand movements, including swipes, taps, and more. Witness how your Raspberry Pi interprets and responds to these gestures in real-time, opening up a world of interactive possibilities. The video provides insights into potential issues you might face during setup and offers practical tips to ensure a seamless experience.

🎓 Conclusion

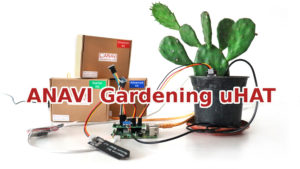
APDS9960 sensor and Raspberry Pi combination offer a compelling glimpse into the exciting world of gesture-based interaction. Instead of using a breadboard and multiple wires it is always easier to rely on one of our add-on boards like ANAVI Infrared pHAT, ANAVI Light pHAT, ANAVI Gardening uHAT, ANAVI Info uHAT, ANAVI Miracle uHAT and ANAVI CO2 uHAT.

So, if you are ready to embark on this exciting journey into gesture recognition technology, grab your Raspberry Pi, APDS9960 sensor, and let’s get started!

You may also like

MicroPython on Raspberry Pi Pico with Thonny IDE

Raspberry Pi Pico is a tiny and fast development board by the Raspberry Pi Foundation built using the brand new RP2040 32-bit dual ARM Cortex-M0+ microcontroller. The major advantage of Raspberry Pi Pico is the affordable price as it is available for about $4 (without taxes and shipping).

In this video tutorial you will learn how to get started with MicroPython using the open source Thonny IDE on Raspberry Pi Pico. Thonny runs on Mac, Windows and Linux distributions, in the video it is used on Ubuntu. The video includes Pico unboxing, MicroPython installation guide, blinking LED example, MicroPython REPL demo and conclusions.

Useful links:

The video tutorial was sponsored by PCBway which provide high-quality prototyping services. On the photo you can see prototypes of green printed circuit boards with white silkscreen following Raspberry Pi specifications for micro Hardware Attached on Top (uHAT).

You may also like

Add Capacitive Soil Moisture Sensors to Raspberry Pi

Raspberry Pi is a famous series of small single-board computers (SBCs) developed in the United Kingdom by the Raspberry Pi Foundation in cooperation with Broadcom. This is a step by step tutorial for using Raspberry Pi and capacitive soil moisture sensor with Microchip MCP3002 analog-to-digital converter (ADC) and a Python script for detecting the soil moisture in percentage.

Capacitive Soil Moisture Sensor

Capacitive Soil Moisture Sensor v1.2 and v2.0 measures the volumetric content of water inside the soil and retrieves the moisture level by capacitive sensing rather than resistive sensing like other sensors. The benefit of using a capacitive soil moisture sensor is the lack of corrosion and longer lifespan.

Wiring

Unlike Raspberry Pi Pico, the recently released microcontroller, all versions and models of the Raspberry Pi single-board computers do not include an analog-to-digital converter (ADC). This tutorial explains how to use Microchip MCP3002 with Raspberry Pi.

Microchip MCP3002 is a 10-bit resolution, dual channel ADC with SPI hardware bus. It can be connected to any Raspberry Pi single board computer version and model, including Raspberry Pi 4 and Raspberry Pi 0. However, this tutorial is not for Raspberry Pi Pico microcontroller. For more details about the wiring of Microchip MCP3002 a Raspberry Pi single-board computer have a look at my previous tutorial.

Prototypes for Raspberry Pi add-on boards

Alternatively, the easier option without a breadboard an a bunch of cables, is to use a dedicated Raspberry Pi add-on board with built-in ADC. Using the free and open source tool KiCad we designed ANAVI Gardening uHAT exactly for this purpose. It has dedicated pins for connecting a couple of capacitive soil moisture sensors. The prototype has been created thanks to PCBWay. This is a lead-free prototype printed circuit board with 2 layers, green solder mask and white silkscreen. PCBway offers a huge variety of colors and even flexible PCB.

Software

Flash Raspberry Pi OS, the official Debian based GNU Linux distribution by the Raspberry Pi, on microSD card and boot it. On the Raspberry Pi, open a terminal and using the raspi-config tool enable SPI as shown in the video. Reboot the Raspberry Pi.

Python3 script for reading data from a couple of capacitive soil moisture sensors through Microchip MCP3002 ADC is available at the anavi-examples repository in GitHub. The script relies on popular Python libraries spidev and RPi.GPIO. Open a terminal and run the following commands to clone anavi-examples and run the script:

git clone https://github.com/AnaviTechnology/anavi-examples.git
cd anavi-examples/anavi-gardening-uhat/soil-moistore-sensors/python/
python3 soil-moistore-sensors.py

You may also like

Getting Started with esptool for flashing firmware on ESP8266 and ESP32

Esptool is a free and open source ESP8266 and ESP32 serial bootloader command-line utility. The source code is available at GitHub under GPLv2 license. It is written in Python therefore it is universal and runs on Microsoft Windows, Mac OS and any GNU/Linux distribution (Ubuntu, Debian, Linux Mint, Fedora, CentOS, OpenSUSE, etc).

Installation

As of today esptool works fine with Python 2.7 or Python 3. Python 2 has been deprecated since January 1, 2020 therefore it is recommended to use esptool with Python 3.

The easier way to install the latest stable version of esptool is from pypi via pip. Open a terminal and execute the following command:

pip install esptool

Flashing Firmware

Using write_flash argument esptool flashed pre-compiled binary to devices with ESP8266 or ESP32. Here are the exact steps:

  • Download an appropriate binary for your ESP8266/ESP32 device.
  • Connect your device to a computer. For example, for ANAVI Thermometer, ANAVI Gas Detector, ANAVI Light Controller and ANAVI Miracle Controller you must use UART to USB debug cable.
  • Turn on the device in boot mode. For example, on ANAVI Thermometer, ANAVI Gas Detector, ANAVI Light Controller and ANAVI Miracle Controller, press and hold the RESET button and plug the power supply.
  • In a terminal execute the following command:
esptool.py --port /dev/ttyUSB0 --baud 460800 write_flash --flash_size=detect 0 firmware.bin 

Finding the Right Firmware

All ANAVI Internet of Things with ESP8266/ESP32 combine free and open source software with open source hardware. The firmware is built using Arduino IDE and a pre-compiled binary file is available at GitHub. Follow the links below to identify your ANAVI device and download appropriate binary for the latest stable firmware:

Of course, alternatively, instead of using esptool you can build the firmware from source through Arduino IDE or PlatformIO.

You may also like

ANAVI Smiley Add-on Board for Raspberry Pi

ANAVI Smiley is a simple open source hardware add-on board for Raspberry Pi. It is compatible with any Raspberry Pi model or version. ANAVI Smiley has educational purposes: it is useful for learning how to solder and how to program. The simplicity of the board makes the kit appropriate for beginner. Example application written in Python shows how to use it.

Closer look at ANAVI Smiley after soldering the kit

ANAVI Smiley combines open source hardware with free and open source software. It has been certified by the Open Source Hardware Association under UID BG000061. ANAVI Smiley is available as a soldering kit with through-hole components:

  • Printed Circuit Board (PCB)
  • 2 LEDs
  • 2 resistors
  • Tactile button
  • Female connector
ANAVI Smiley soldering kit with all components

The color of the LEDs may vary. The primary kit includes with one green and another red LED, but there is also a kit with 2 yellow LEDs.

ANAVI Smiley with red and green LED as well another unit with 2 yellow LEDs

Have a look at the video for the exact steps how to solder ANAVI Smiley and to use it with Raspberry Pi.

A photo of ANAVI Smiley a moment after the kit has been assembled.

The short leg of the LED must go to ground (GND), aka the hole marked with a square on the printed circuit board. It is recommended to solder 4-pin connector on the opposite side, as shown on the picture. This way ANAVI Smiley will fit better on the 40-pin header of Raspberry Pi.

Python3 script to use ANAVI Smiley on a Raspberry Pi is available at GitHub. It relies on gpiozero to control the LEDs and to read the state of the button. Gpiozero is a simple and convenient Python interface to GPIO devices with Raspberry Pi, started by Ben Nuttall and Dave Jones.

Please note that SW1 button on the PCB doesn’t have a resistor, therefore your application must use the internal pull-up resistor present on each Raspberry Pi GPIO, for example with gpiozero in Python and pin 26:

btn = Button(26, pull_up = True, bounce_time=0.1)
ANAVI Smiley PCB in KiCad

ANAVI Smiley has been designed with the free and open source software tool KiCad. The whole KiCad project is also in GitHub. The two layer printed circuit board is made in Plovdiv, Bulgaria.

You may also like